- Published on
Setting Up a Private Ethereum Network with Geth
Geth
Geth is a concrete implementation of the Ethereum protocol. Through Geth, you can implement various Ethereum features, such as creating, editing, and deleting accounts, starting mining, transferring Ether, and deploying and executing smart contracts.
Geth, also known as go-ethereum, is one of three implementations of the Ethereum protocol. Geth can be installed on many operating systems, including Windows, Linux, Mac OSX, Android, and iOS.
Installation
brew tap ethereum/ethereum
brew install ethereum
The process takes a while — be patient. After installation, run geth version to verify:
$ geth version
Geth
Version: 1.7.3-stable
Architecture: amd64
Protocol Versions: [63 62]
Network Id: 1
Go Version: go1.9.3
Operating System: darwin
GOPATH=
GOROOT=/usr/local/Cellar/go/1.9.3/libexec
Defining the Private Genesis State
First, you need to define the starting state of the private network. All subsequent nodes need to agree on this. The starting state is defined by a JSON file, for example genesis.json.
Navigate to a directory in the command line and create the file genesis.json.
{
  "config": {
        "chainId": 123456,
        "homesteadBlock": 0,
        "eip155Block": 0,
        "eip158Block": 0
    },
  "alloc"      : {},
  "coinbase"   : "0x0000000000000000000000000000000000000000",
  "difficulty" : "0x20000",
  "extraData"  : "",
  "gasLimit"   : "0x2fefd8",
  "nonce"      : "0x0000000000000042",
  "mixhash"    : "0x0000000000000000000000000000000000000000000000000000000000000000",
  "parentHash" : "0x0000000000000000000000000000000000000000000000000000000000000000",
  "timestamp"  : "0x00"
}
-
config.chainId// The blockchain ID; the--networkidparameter in the geth command must match the chainId value -
config.homesteadBlock// Homestead hard fork block height; no need to worry about this -
config.eip155Block// EIP 155 hard fork height; no need to worry about this -
config.eip158Block// EIP 158 hard fork height; no need to worry about this -
coinbase// The miner account; after the first block is mined, the Ether reward will be sent to this miner account -
difficulty// Difficulty value; the higher, the harder -
extraData// Additional information; fill in anything -
gasLimit// The total gas consumption limit, used to limit the total amount of transaction information a block can contain; set to the maximum since this is a private chain -
nonce// A 64-bit random number -
mixhash// Used with nonce for mining; a hash generated from part of the previous block -
parentHash// The hash value of the previous block -
alloc// Preset accounts and their Ether balances; can be left unconfigured since mining on a private chain is easy
Typically the definitions above work fine, but it's best to change the nonce to some random value to prevent being connected to by unknown remote nodes. The alloc field can be used to configure accounts, for example to provide funds for testing.
"alloc": {
  "0x0000000000000000000000000000000000000001": {"balance": "111111111"},
  "0x0000000000000000000000000000000000000002": {"balance": "222222222"}
}
After defining the genesis state in the JSON file, you also need to initialize each Geth node before starting, to ensure all blockchain parameters are set correctly. Run the following in the project directory:
$ geth --datadir "./node_01" init genesis.json
"./node_01" specifies the directory where the node data is saved.
WARN [02-05|12:07:43] No etherbase set and no accounts found as default
INFO [02-05|12:07:43] Allocated cache and file handles         database=/Users/qd-hxt/Documents/gworkspace/private-eth/node_01/geth/chaindata cache=16 handles=16
INFO [02-05|12:07:43] Writing custom genesis block
INFO [02-05|12:07:43] Successfully wrote genesis state         database=chaindata                                                             hash=b63ed5…4c90c6
INFO [02-05|12:07:43] Allocated cache and file handles         database=/Users/qd-hxt/Documents/gworkspace/private-eth/node_01/geth/lightchaindata cache=16 handles=16
INFO [02-05|12:07:43] Writing custom genesis block
INFO [02-05|12:07:43] Successfully wrote genesis state         database=lightchaindata                                                             hash=b63ed5…4c90c6
Running the Interactive Console
We can run Geth's built-in JavaScript console with the following command:
geth --datadir "./node_01" console 2>console.log
Output:
Welcome to the Geth JavaScript console!

instance: Geth/v1.7.3-stable/darwin-amd64/go1.9.3
 modules: admin:1.0 debug:1.0 eth:1.0 miner:1.0 net:1.0 personal:1.0 rpc:1.0 txpool:1.0 web3:1.0
Type exit to quit.
Starting the Node
$ geth --datadir "./node_01" --nodiscover --networkid 1234 console 2>console.log
-
--networkidmust match the chainId in genesis.json -
--identitysets the node ID -
--portgeth node port; default: 30303 -
--rpcenables the RPC service; default: 8545 -
--rpcportRPC service port -
--rpccorsdomainsetting"*"here allows access from any domain; you can also specify a specific domain such as"http://yourdomain.com"
--nodiscover disables automatic node discovery
--verbositylog level: 0=silent, 1=error, 2=warn, 3=info, 4=debug, 5=detail (default: 3)
You can use admin.nodeInfo to view node information.
> admin.nodeInfo
{
  enode: "enode://1c95422acbab6a5142a23d17e60797fbda2217e4e34ba2924eb7eec7f7fad4622f29cdad7f9ac67b832f9634530565c967c9bf50de8443169ad88c7c27f4c6f2@[::]:30303?discport=0",
  id: "1c95422acbab6a5142a23d17e60797fbda2217e4e34ba2924eb7eec7f7fad4622f29cdad7f9ac67b832f9634530565c967c9bf50de8443169ad88c7c27f4c6f2",
  ip: "::",
  listenAddr: "[::]:30303",
  name: "Geth/v1.7.3-stable/darwin-amd64/go1.9.3",
  ports: {
    discovery: 0,
    listener: 30303
  },
  protocols: {
    eth: {
      difficulty: 131072,
      genesis: "0xb63ed5e47ea59262356fed3e0bfa207cdd1d2253f57ec02acea174dde44c90c6",
      head: "0xb63ed5e47ea59262356fed3e0bfa207cdd1d2253f57ec02acea174dde44c90c6",
      network: 1234
    }
  }
}
Creating a User
Create an account in the console:
> personal.newAccount('123456')
"0x0e037e8e4e2af2756e6ce92b8493d4fddeb85536"
Here, '123456' is the account password.
View the account list:
> personal.listAccounts
["0x0e037e8e4e2af2756e6ce92b8493d4fddeb85536"]
Creating and Starting a Second Node
In a new terminal, run:
$ geth --datadir "./node_02" init genesis.json
WARN [02-05|12:07:43] No etherbase set and no accounts found as default
INFO [02-05|12:07:43] Allocated cache and file handles         database=/Users/qd-hxt/Documents/gworkspace/private-eth/node_01/geth/chaindata cache=16 handles=16
INFO [02-05|12:07:43] Writing custom genesis block
INFO [02-05|12:07:43] Successfully wrote genesis state         database=chaindata                                                             hash=b63ed5…4c90c6
INFO [02-05|12:07:43] Allocated cache and file handles         database=/Users/qd-hxt/Documents/gworkspace/private-eth/node_01/geth/lightchaindata cache=16 handles=16
INFO [02-05|12:07:43] Writing custom genesis block
INFO [02-05|12:07:43] Successfully wrote genesis state         database=lightchaindata                                                             hash=b63ed5…4c90c6
$ geth --datadir "./node_02" --port 30304 --nodiscover --networkid 1234 console 2>console.log
Use --port 30304 to change the port and avoid conflicts.
Connecting Nodes
Check currently connected nodes in the network.
> admin.peers
[]
As you can see, there are no nodes connected yet.
In the first node's terminal, run:
admin.addPeer("enode://d173c99eef3e8c540ca47e60b42060f1cdd1cde1aa8d7344962bdafdd0859e8b95e3f475e1c902e1a156f999113d8f9845459afae158896641d4afefe271fb82@[::]:30304?discport=0")
"enode://d173c99eef3e8c540ca47e60b42060f1cdd1cde1aa8d7344962bdafdd0859e8b95e3f475e1c902e1a156f999113d8f9845459afae158896641d4afefe271fb82@[::]:30304?discport=0" is the enode information from the second node's admin.nodeInfo.
Checking the node list again, you can now see:
> admin.peers

[{
    caps: ["eth/63"],
    id: "d173c99eef3e8c540ca47e60b42060f1cdd1cde1aa8d7344962bdafdd0859e8b95e3f475e1c902e1a156f999113d8f9845459afae158896641d4afefe271fb82",
    name: "Geth/v1.7.3-stable/darwin-amd64/go1.9.3",
    network: {
      localAddress: "[::1]:49893",
      remoteAddress: "[::1]:30304"
    },
    protocols: {
      eth: {
        difficulty: 131072,
        head: "0xb63ed5e47ea59262356fed3e0bfa207cdd1d2253f57ec02acea174dde44c90c6",
        version: 63
      }
    }
}]
Perform a similar operation in the second terminal.
Mining
Check the block count:
> eth.blockNumber
0
This is because mining hasn't started yet. Run the following command in the first terminal to start mining:
>  miner.start(1)

null
Open a new terminal window and run:
$ tail -f console.log
INFO [02-05|15:36:45] Generating DAG in progress               epoch=0 percentage=28 elapsed=1m34.530s
INFO [02-05|15:36:50] Generating DAG in progress               epoch=0 percentage=29 elapsed=1m39.512s
INFO [02-05|15:36:54] Generating DAG in progress               epoch=0 percentage=30 elapsed=1m44.081s
INFO [02-05|15:36:59] Generating DAG in progress               epoch=0 percentage=31 elapsed=1m48.749s
INFO [02-05|15:37:04] Generating DAG in progress               epoch=0 percentage=32 elapsed=1m53.884s
INFO [02-05|15:37:09] Generating DAG in progress               epoch=0 percentage=33 elapsed=1m58.900s
INFO [02-05|15:37:14] Generating DAG in progress               epoch=0 percentage=34 elapsed=2m3.577s
INFO [02-05|15:37:18] Generating DAG in progress               epoch=0 percentage=35 elapsed=2m7.553s
INFO [02-05|15:37:22] Generating DAG in progress               epoch=0 percentage=36 elapsed=2m11.685s
INFO [02-05|15:37:25] Generating DAG in progress               epoch=0 percentage=37 elapsed=2m15.286s
INFO [02-05|15:37:29] Generating DAG in progress               epoch=0 percentage=38 elapsed=2m18.724s
INFO [02-05|15:37:32] Generating DAG in progress               epoch=0 percentage=39 elapsed=2m22.083s
When the percentage reaches 100, mining will begin. Check the block count again after a while:
> eth.blockNumber
5
Stop mining:
> miner.stop()

true
In the other node's terminal, running eth.blockNumber will also show the block count, because when the first block is mined, the block information is broadcast. The second node, upon receiving and verifying the block information, adds it to the chain.
Querying Block Information
You can see that the files under node_01/geth/chaindata and node_02/geth/chaindata are similar; in fact, the data in those files is identical.
In the first node's terminal, view the block at index 12:
> eth.getBlock(12)
{
  difficulty: 131648,
  extraData: "0xd883010703846765746887676f312e392e338664617277696e",
  gasLimit: 3178585,
  gasUsed: 0,
  hash: "0xe83828e13135003f69ade5c5828aa5ef335ca6daf618572aa11aa06dc9074a38",
  logsBloom: "0x00000000000000000000000000000000000000000000000000000000000000000000000000000000000000000000000000000000000000000000000000000000000000000000000000000000000000000000000000000000000000000000000000000000000000000000000000000000000000000000000000000000000000000000000000000000000000000000000000000000000000000000000000000000000000000000000000000000000000000000000000000000000000000000000000000000000000000000000000000000000000000000000000000000000000000000000000000000000000000000000000000000000000000000000000000000",
  miner: "0x0e037e8e4e2af2756e6ce92b8493d4fddeb85536",
  mixHash: "0x056e37a82d539164a0418a376c26aac82ea40b0ca9faf5f8bc29b9f35f672f2a",
  nonce: "0x1824b7b8e8a8f89a",
  number: 12,
  parentHash: "0xcb6654430e3a39855563078c937aa3079ab2908c6ce36cfcc16cffc7713cdec3",
  receiptsRoot: "0x56e81f171bcc55a6ff8345e692c0f86e5b48e01b996cadc001622fb5e363b421",
  sha3Uncles: "0x1dcc4de8dec75d7aab85b567b6ccd41ad312451b948a7413f0a142fd40d49347",
  size: 536,
  stateRoot: "0x24ab7bb56c97cfd67d95571cd3f1ea20cd12707992fe65ddd3759ec57f737e5d",
  timestamp: 1517816470,
  totalDifficulty: 1706816,
  transactions: [],
  transactionsRoot: "0x56e81f171bcc55a6ff8345e692c0f86e5b48e01b996cadc001622fb5e363b421",
  uncles: []
}
The same block information can be viewed from the second node's terminal, both with a hash of 0xe83828e13135003f69ade5c5828aa5ef335ca6daf618572aa11aa06dc9074a38.
Querying block 78's hash also returns 0x8d7acfd94b2fb0286e0c1477f70584bbe9ed723be3890e4bb575266cf983b4bf on both nodes.
Note: The
--networkidparameter must be consistent, otherwiseadmin.peerswill not find the peer after adding.
Use the command eth.getBlock(eth.blockNumber).miner to view the miner of the most recently mined block.
> eth.getBlock(eth.blockNumber).miner
"0x0e037e8e4e2af2756e6ce92b8493d4fddeb85536"
As you can see, the output is the first node's account address:
> personal.listAccounts
["0x0e037e8e4e2af2756e6ce92b8493d4fddeb85536"]
Check the account balance of the miner address; as mining continues, the account balance keeps increasing:
> eth.getBalance(eth.getBlock(eth.blockNumber).miner)
7.18e+21
> eth.getBalance(eth.getBlock(eth.blockNumber).miner)
7.185e+21
> eth.getBalance(eth.getBlock(eth.blockNumber).miner)
7.19e+21
Add an account on the second node (an account must be added before mining), and start mining:
> personal.newAccount()
Passphrase:
Repeat passphrase:
"0xa61d11112ea4cdcde9a1107062d0e773b7eec2c9"
> personal.listAccounts
["0xa61d11112ea4cdcde9a1107062d0e773b7eec2c9"]

> miner.start(1)
null
After initialization is complete, check the miner of the latest block:
> eth.getBlock(eth.blockNumber).miner
"0xa61d11112ea4cdcde9a1107062d0e773b7eec2c9"
> eth.getBlock(eth.blockNumber).miner
"0xa61d11112ea4cdcde9a1107062d0e773b7eec2c9"
> eth.getBlock(eth.blockNumber).miner
"0x0e037e8e4e2af2756e6ce92b8493d4fddeb85536"
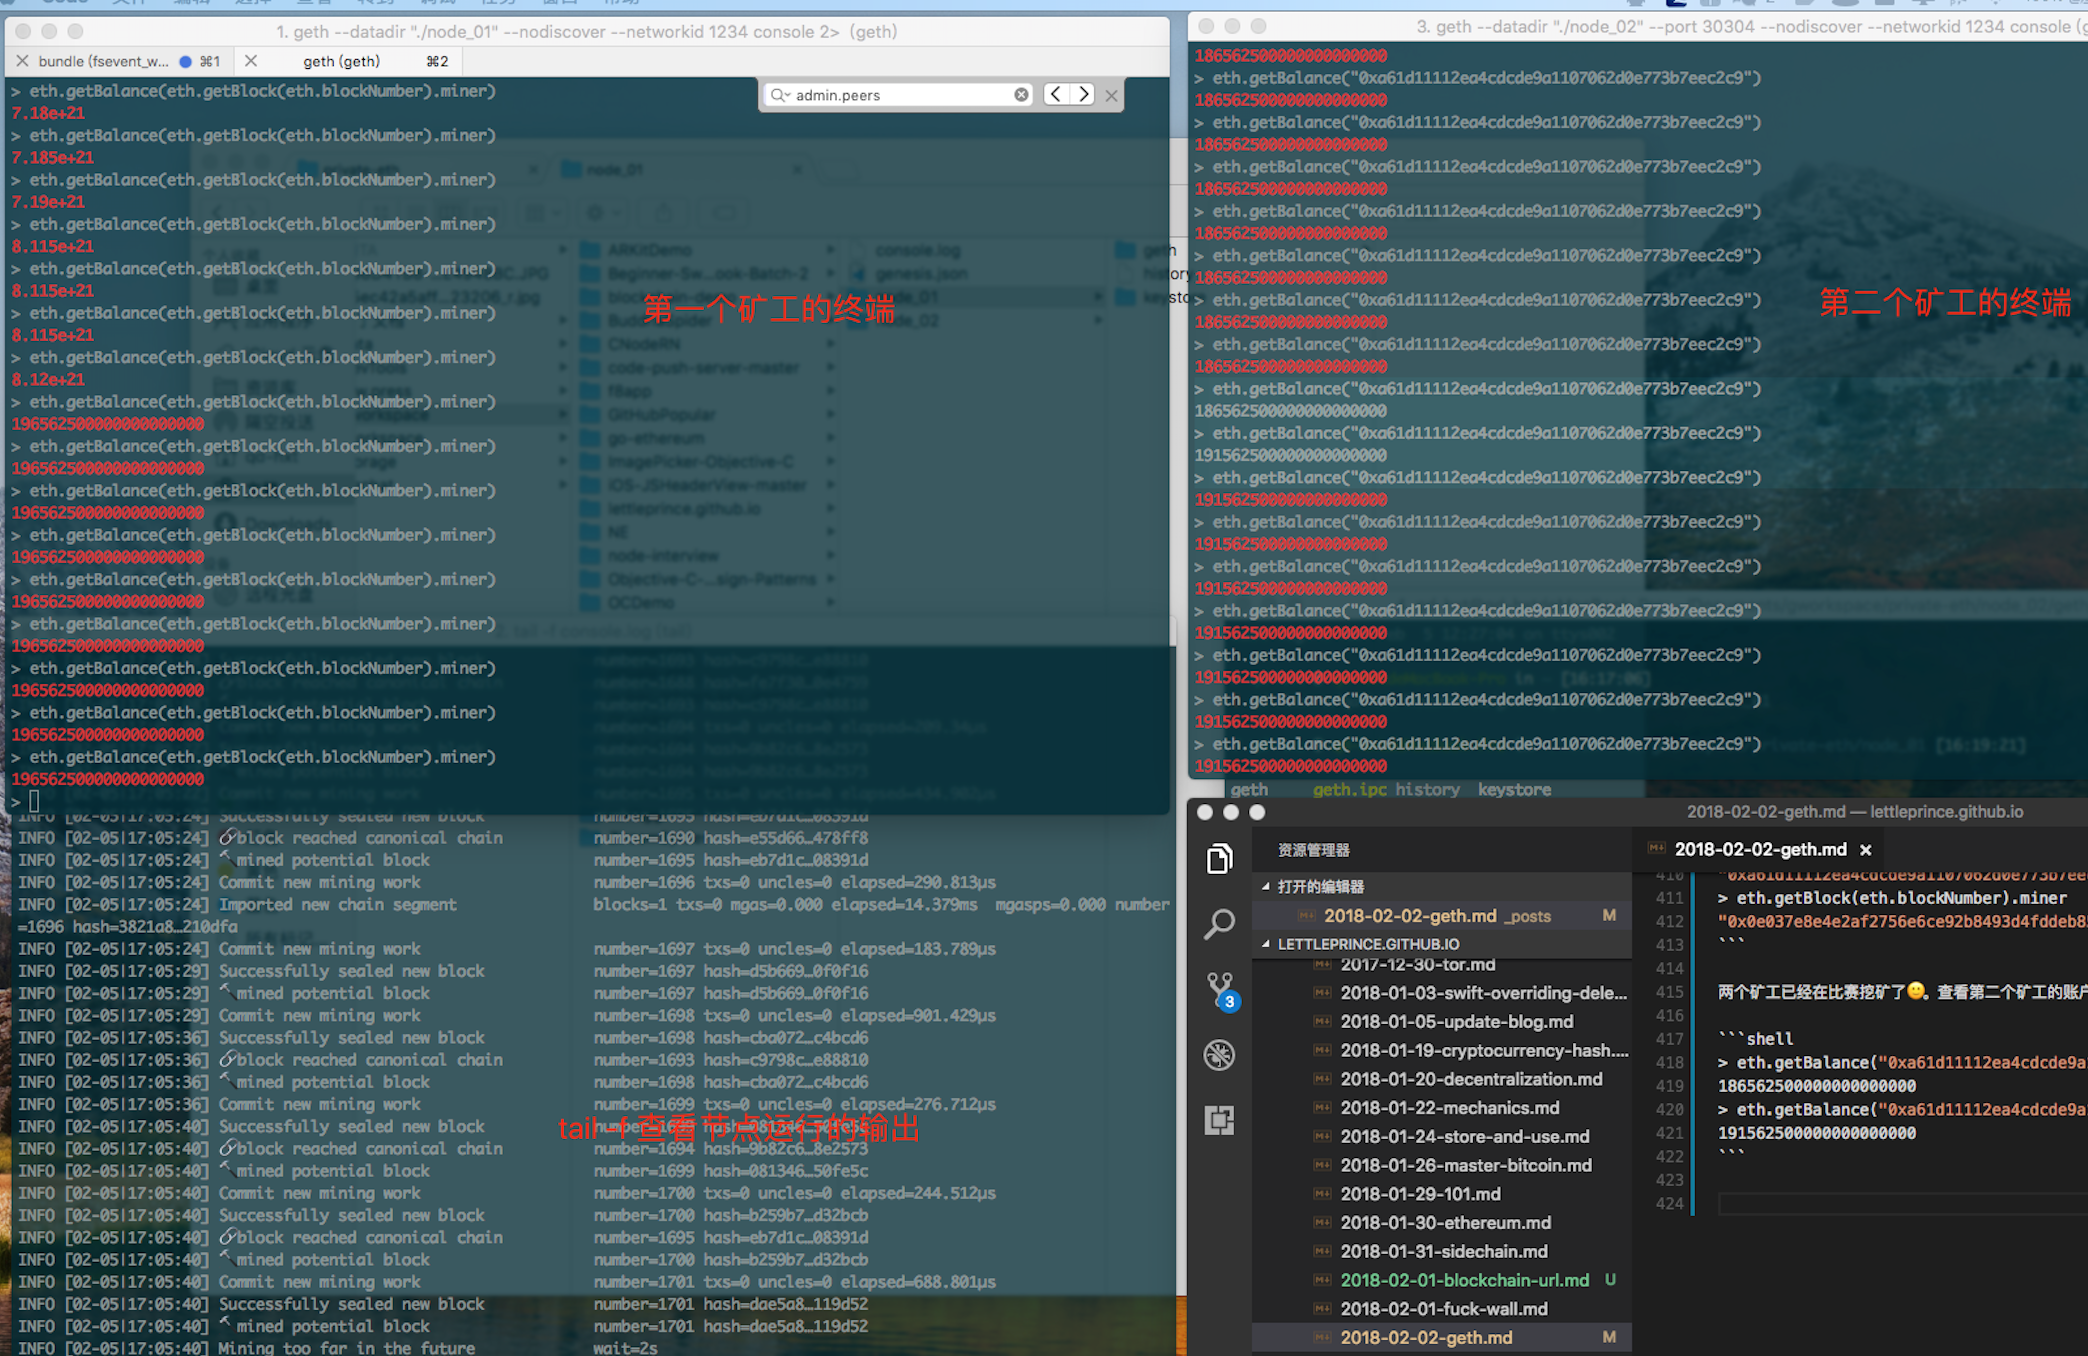
The two miners are now racing to mine 🙂. Check the second miner's account:
> eth.getBalance("0xa61d11112ea4cdcde9a1107062d0e773b7eec2c9")
186562500000000000000
> eth.getBalance("0xa61d11112ea4cdcde9a1107062d0e773b7eec2c9")
191562500000000000000
Here is a desktop screenshot for reference:
Supplement:
Using IPC calls (referring to other processes on the same computer using the IPC file to create two-way communication with geth, for example calling the same node from another terminal):
$ geth --datadir "./node_01" --nodiscover --networkid 1234 --ipcpath "./node_01/geth.ipc" console 2>console.log
$ geth --datadir "./node_02" --port 30304 --nodiscover --networkid 1234 --ipcpath "./node_02/geth.ipc" console 2>console.log
Calling from another terminal:
$ geth attach ipc:./node_01/geth.ipc
Welcome to the Geth JavaScript console!

instance: Geth/v1.7.3-stable/darwin-amd64/go1.9.3
coinbase: 0x0e037e8e4e2af2756e6ce92b8493d4fddeb85536
at block: 2106 (Mon, 05 Feb 2018 17:22:51 CST)
 datadir: /Users/qd-hxt/Documents/gworkspace/private-eth/node_01
 modules: admin:1.0 debug:1.0 eth:1.0 miner:1.0 net:1.0 personal:1.0 rpc:1.0 txpool:1.0 web3:1.0

>