- Published on
First Experience with Core ML
Core ML lets you integrate a broad variety of machine learning model types into your app. In addition to supporting extensive deep learning with over 30 layer types, it also supports standard models such as tree ensembles, SVMs, and generalized linear models. Because it's built on top of low level technologies like Metal and Accelerate, Core ML seamlessly takes advantage of the CPU and GPU to provide maximum performance and efficiency. You can run machine learning models on the device so data doesn't need to leave the device to be analyzed.
At WWDC 2017, alongside ARKit, Apple unveiled another highly anticipated framework — Core ML. With this framework, we can easily add Machine Learning capabilities to our apps. Just how easy? Let's build an image recognition app and find out.
I hadn't previously studied Neural Networks or Machine Learning in depth. The model used here was downloaded from here.
I honestly had no idea what Machine Learning really was — but I still managed to build an impressive-looking Machine Learning app.
About Machine Learning
First, let's get a brief understanding of Machine Learning. A common definition: Machine Learning is a branch of artificial intelligence science. Its primary focus is on how to improve algorithms through experience. The process of learning from experience is called "training," and the knowledge gained from that training can be called a "model." The methods and processes for training and building models are complex, but our goal for now is to use an existing model to build an interesting app — and with Apple's Core ML, the process becomes much easier.
App Overview
The app is called Pixabay4ML. It uses the Core ML framework and a model to identify the content of a randomly downloaded image from Pixabay. With a bit of luck, you might even get a photo of a beautiful scene.
Creating the Project
The project setup is straightforward. The main pod libraries used are:
  pod 'Alamofire',    '4.6.0'  # for network requests
  pod 'Fuzi',         '2.0.1'  # for parsing HTML
  pod 'Kingfisher',   '4.5.0'  # for loading images
Building the UI is not particularly difficult — it's also a good opportunity to get more familiar with Swift syntax.
Integrating the Core ML Model
Next, we need to integrate a Core ML model into our project. Here we use the Inception v3 model provided by Apple. After downloading it, add it to the project to view its basic information.
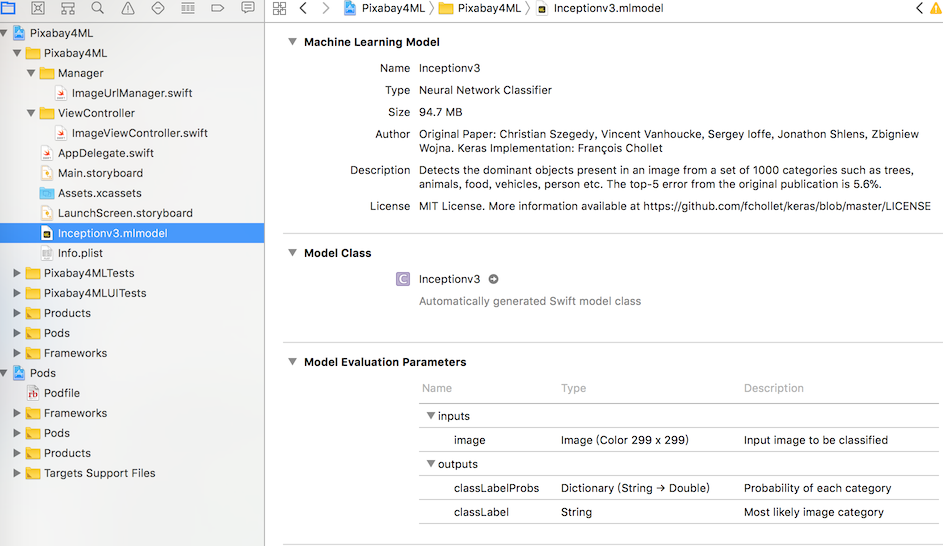
You can see the inputs and outputs types in Model Evaluation Parameters. The input is a 299×299 image, and the output is a dictionary and a string describing the most likely classification and its probability. The Model Class is Inceptionv3. Click the small arrow on the right to view the model definition.
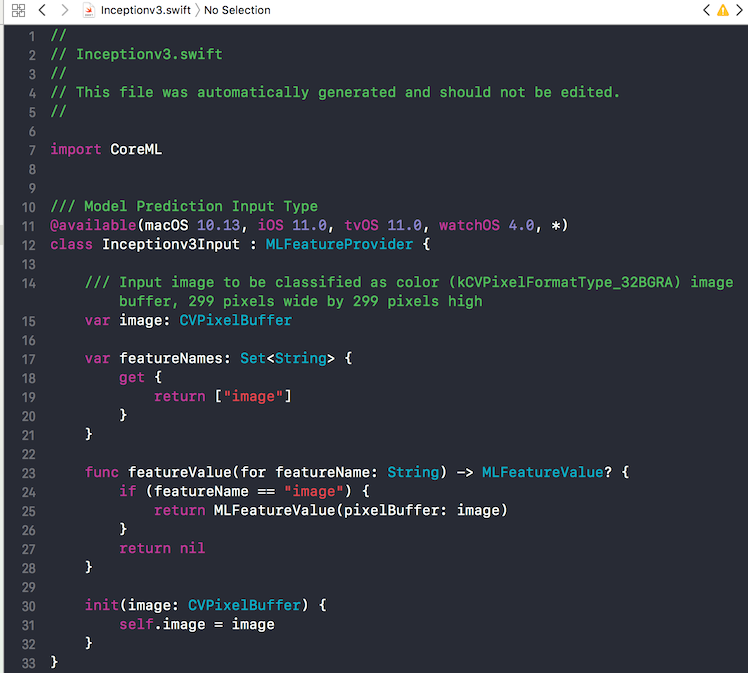
In the code, import the CoreML framework:
import CoreML
Then declare a variable of type Inceptionv3 and initialize it in viewDidLoad:
model = Inceptionv3()
Input Conversion
The image downloaded via Kingfisher needs to be converted to an input-compatible format. This part mainly involves the CoreImage framework:
func predictImage(_ image:UIImage) {

    // Scale the image to a 299*299 square
    UIGraphicsBeginImageContextWithOptions(CGSize(width: 299, height: 299), true, 2.0)
    image.draw(in: CGRect(x: 0, y: 0, width: 299, height: 299))
    let newImage = UIGraphicsGetImageFromCurrentImageContext()!
    UIGraphicsEndImageContext()

//        Convert newImage to CVPixelBuffer. CVPixelBuffer is an image buffer that holds pixels in main memory.
//        Since it starts with CV, it belongs to the CoreVideo module.
    let attrs = [kCVPixelBufferCGImageCompatibilityKey: kCFBooleanTrue, kCVPixelBufferCGBitmapContextCompatibilityKey: kCFBooleanTrue] as CFDictionary
    var pixelBuffer : CVPixelBuffer?
    let status = CVPixelBufferCreate(kCFAllocatorDefault, Int(newImage.size.width), Int(newImage.size.height), kCVPixelFormatType_32ARGB, attrs, &pixelBuffer)
    guard (status == kCVReturnSuccess) else {
        return
    }

    CVPixelBufferLockBaseAddress(pixelBuffer!, CVPixelBufferLockFlags(rawValue: 0))
    let pixelData = CVPixelBufferGetBaseAddress(pixelBuffer!)

    let rgbColorSpace = CGColorSpaceCreateDeviceRGB()
    let context = CGContext(data: pixelData, width: Int(newImage.size.width), height: Int(newImage.size.height), bitsPerComponent: 8, bytesPerRow: CVPixelBufferGetBytesPerRow(pixelBuffer!), space: rgbColorSpace, bitmapInfo: CGImageAlphaInfo.noneSkipFirst.rawValue) //3

    context?.translateBy(x: 0, y: newImage.size.height)
    context?.scaleBy(x: 1.0, y: -1.0)

    UIGraphicsPushContext(context!)
    newImage.draw(in: CGRect(x: 0, y: 0, width: newImage.size.width, height: newImage.size.height))
    UIGraphicsPopContext()
    CVPixelBufferUnlockBaseAddress(pixelBuffer!, CVPixelBufferLockFlags(rawValue: 0))
}
Prediction
The prediction method for the Inceptionv3 model is func prediction(image: CVPixelBuffer) throws -> Inceptionv3Output, which takes a CVPixelBuffer (299×299) as its parameter — that's why we needed to convert the image type above.
Making a prediction with Core ML is straightforward:
/// Predict the image
guard let prediction = try? model.prediction(image: pixelBuffer!) else {
    return
}

print(prediction.classLabel)
Run the app and the predicted category will be printed to the console.
Completing the UI
Now let's finalize the UI by displaying the prediction results in the view.
classLabel.isHidden = false
classLabel.text = "Likely: \(prediction.classLabel)"

probLabel.isHidden = false
probLabel.text = "Probability: \(String(describing: prediction.classLabelProbs[prediction.classLabel]!.description))"
After testing, some images have noticeably inaccurate predictions — this is a limitation of the model. We can switch to a more targeted model, or restrict the type of images (by adding a cat=animals parameter to the request URL) to improve accuracy.
It feels like just a few lines of code were enough to implement a machine learning feature.
References:
Introduction to Core ML: Building a Simple Image Recognition App
Code:
All code from this article can be found on my GitHub: Pixabay4ML.