- Published on
Simple V2Ray Deployment
About V2Ray
Project V is a set of tools that can help you build your own dedicated base communication network. The core tool of Project V is called V2Ray, which is primarily responsible for implementing network protocols and functions, and communicates with other Project V tools. V2Ray can run standalone or work together with other tools to provide a streamlined workflow.
For more information and resources, please refer to: https://v2ray.com/.
V2Ray is more like a platform of tools, supporting a range of protocols, including Shadowsocks, though given recent stability and usability, using SS is not recommended. This article uses the VMess protocol.
Deployment
The following steps assume a VPS has already been deployed and you are logged in as the root user. For details, refer to the article: The Complete Guide to Bypassing Internet Censorship
Download V2Ray
[root@ss-1 ~]# wget https://install.direct/go.sh
--2019-06-24 07:32:51--  https://install.direct/go.sh
Resolving install.direct (install.direct)... 104.31.178.6, 104.31.179.6, 2606:4700:30::681f:b306, ...
Connecting to install.direct (install.direct)|104.31.178.6|:443... connected.
HTTP request sent, awaiting response... 200 OK
Length: unspecified [text/plain]
Saving to: "go.sh"

    [ <=>                                             ] 13,871      --.-K/s in 0s

2019-06-24 07:32:51 (81.7 MB/s) - "go.sh" saved [13871]
Then run the script to install V2Ray:
[root@ss-1 ~]# bash go.sh
Installing V2Ray v4.19.1 on x86_64
Downloading V2Ray: https://github.com/v2ray/v2ray-core/releases/download/v4.19.1/v2ray-linux-64.zip
  % Total    % Received % Xferd  Average Speed   Time    Time     Time  Current
                                 Dload  Upload   Total   Spent    Left  Speed
100   608    0   608    0     0   2026      0 --:--:-- --:--:-- --:--:--  2033
100 11.2M  100 11.2M    0     0  4894k      0  0:00:02  0:00:02 --:--:-- 7245k
Updating software repo
http://mirror.nodesdirect.com/epel/7/x86_64/repodata/d61cfa966bb2988b5ecc41dc76376385f8d0094d473a3d2bfb26c0416adda7eb-updateinfo.xml.bz2: [Errno 14] HTTP Error 404 - Not Found
Trying other mirror.
To address this issue please refer to the below wiki article

https://wiki.centos.org/yum-errors

If above article doesn't help to resolve this issue please use https://bugs.centos.org/.

https://mirror.vcu.edu/pub/gnu%2Blinux/epel/7/x86_64/repodata/ac968a1fb8c66bbce1c8f8e5f524fad2163e3dd799f35a02fd138ed8ae0f6797-filelists.sqlite.bz2: [Errno 14] HTTPS Error 404 - Not Found
Trying other mirror.
http://mirror.us.leaseweb.net/epel/7/x86_64/repodata/8b3a849ac7aae91918aba9fb66c2d2532e9bb39a2700c8168eff11ad0b6e7b7e-other.sqlite.bz2: [Errno 14] HTTP Error 404 - Not Found
Trying other mirror.
Installing unzip
Extracting V2Ray package to /tmp/v2ray.
Archive:  /tmp/v2ray/v2ray.zip
  inflating: /tmp/v2ray/config.json
   creating: /tmp/v2ray/doc/
  inflating: /tmp/v2ray/doc/readme.md
  inflating: /tmp/v2ray/geoip.dat
  inflating: /tmp/v2ray/geosite.dat
   creating: /tmp/v2ray/systemd/
  inflating: /tmp/v2ray/systemd/v2ray.service
   creating: /tmp/v2ray/systemv/
  inflating: /tmp/v2ray/systemv/v2ray
  inflating: /tmp/v2ray/v2ctl
 extracting: /tmp/v2ray/v2ctl.sig
  inflating: /tmp/v2ray/v2ray
 extracting: /tmp/v2ray/v2ray.sig
  inflating: /tmp/v2ray/vpoint_socks_vmess.json
  inflating: /tmp/v2ray/vpoint_vmess_freedom.json
PORT:11234
UUID:62b1262c-8c69-4f04-aa33-b45bf1eb8414
Created symlink from /etc/systemd/system/multi-user.target.wants/v2ray.service to /etc/systemd/system/v2ray.service.
V2Ray v4.19.1 is installed.
The PORT:11234 and UUID:62b1262c-8c69-4f04-aa33-b45bf1eb8414 from above will be needed later.
Start V2Ray
systemctl start v2ray
Configure the Firewall
Do not skip this step, otherwise everything configured afterward will be useless. CentOS 7.0 uses firewall as the default firewall.
Open a port
firewall-cmd --zone=public --add-port=80/tcp --permanent
Parameter meanings:
-- zone #scope -- add-port=80/tcp #add port, format: port/protocol -- permanent #permanent, without this parameter the change will not persist after a restart
[root@ss-1 ~]# firewall-cmd --zone=public --add-port=11234/tcp --permanent
success
The 11234 above comes from PORT:11234 in the installation script output. You can then run firewall-cmd --list-ports to view the configuration.
For CentOS 6.0, use iptables instead.
Commands:
vi /etc/sysconfig/iptables

-A INPUT -m state --state NEW -m tcp -p tcp --dport 11234 -j ACCEPT

systemctl restart iptables.service # restart firewall to apply the configuration
Client Installation
I use a Mac, so I chose V2RayX. For other platforms, you can choose and download from here.
Server-Side Configuration
V2Ray configuration uses JSON format, which is relatively complex. If you're a developer, you should find it familiar. The default server-side configuration path is /etc/v2ray/config.json.
Edit the configuration with vi /etc/v2ray/config.json.
{
  "inbounds": [{
    "port": 11234,
    "protocol": "vmess",
    "settings": {
      "clients": [
        {
          "id": "62b1262c-8c69-4f04-aa33-b45bf1eb8414",
          "level": 1,
          "alterId": 64
        }
      ]
    }
  }],
  "outbounds": [{
    "protocol": "freedom",
    "settings": {}
  },{
    "protocol": "blackhole",
    "settings": {},
    "tag": "blocked"
  }],
  "routing": {
    "rules": [
      {
        "type": "field",
        "ip": ["geoip:private"],
        "outboundTag": "blocked"
      }
    ]
  }
}
Necessary explanations:
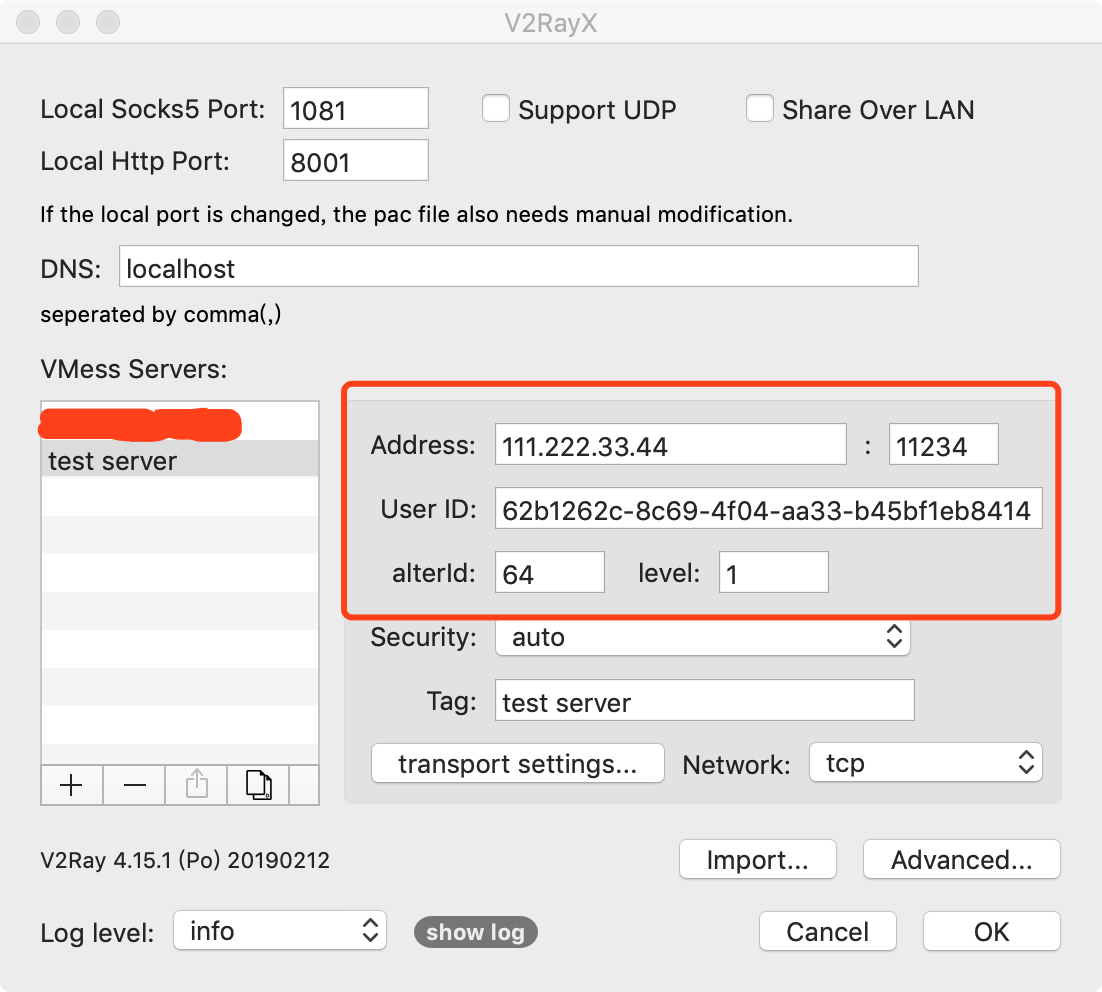
"port": 11234 is the port mentioned earlier. Note: this is the server's port.
"id": "62b1262c-8c69-4f04-aa33-b45bf1eb8414", is the client ID, which must match the client configuration (covered later).
"level": 1, and "alterId": 64 will also be used in the client configuration; just keep them consistent.
Client Configuration
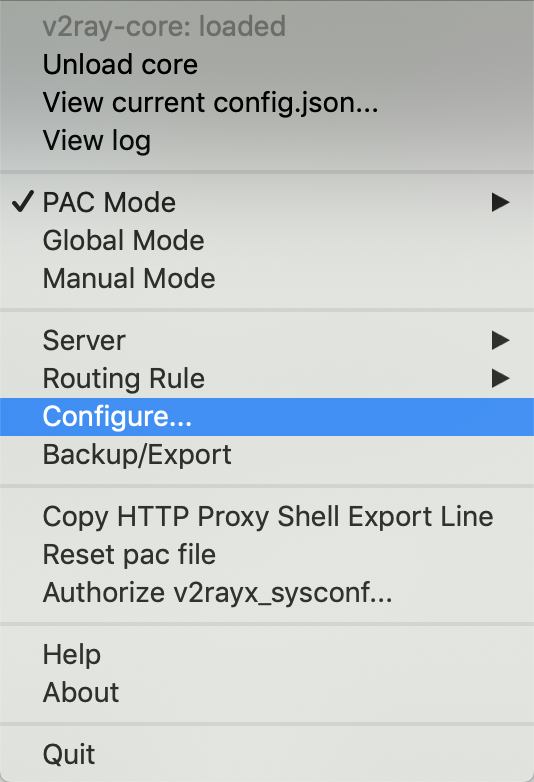
After opening V2RayX, look at its menu and open Configure.
Then fill in the corresponding configuration based on the JSON above.
After confirming, check Load core from the menu. If all previous steps were done correctly, you should now be able to browse freely.
Troubleshooting and Optimization
Only basic approaches and methods are provided here.
V2Ray has logs to help with troubleshooting. View the client configuration and logs as follows.
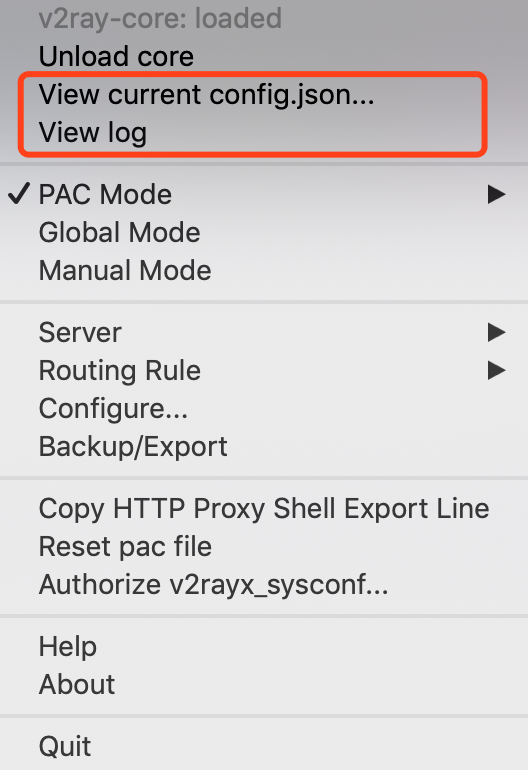
The server-side logs need to be configured first before they are recorded.
Edit the configuration with vi /etc/v2ray/config.json.
Add the configuration below. Make sure not to miss the English-mode commas.
{
  "inbounds": [{
    "port": 11234,
    "protocol": "vmess",
    "settings": {
      "clients": [
        {
          "id": "62b1262c-8c69-4f04-aa33-b45bf1eb8414",
          "level": 1,
          "alterId": 64
        }
      ]
    }
  }],
  "outbounds": [{
    "protocol": "freedom",
    "settings": {}
  },{
    "protocol": "blackhole",
    "settings": {},
    "tag": "blocked"
  }],
  "routing": {
    "rules": [
      {
        "type": "field",
        "ip": ["geoip:private"],
        "outboundTag": "blocked"
      }
    ]
  },
  "log": {
    "loglevel": "info",
    "access": "/var/log/v2ray/access.log",
    "error": "/var/log/v2ray/error.log"
  }
}
You can then view the server-side logs with the command tail -f /var/log/v2ray/error.log. During my first configuration, I forgot to open the firewall port and deduced this by examining the logs.
In addition, since we're using the TCP protocol, HTTP header obfuscation can be applied. See here for details.
The key configuration is:
"streamSettings": {
        "network": "tcp",
        "tcpSettings": {
          "header": {
            "type": "http",
            "response": {
              "version": "1.1",
              "status": "200",
              "reason": "OK",
              "headers": {
                "Content-Type": ["application/octet-stream", "application/x-msdownload", "text/html", "application/x-shockwave-flash"],
                "Transfer-Encoding": ["chunked"],
                "Connection": ["keep-alive"],
                "Pragma": "no-cache"
              }
            }
          }
        }
      }
Add this inside inbounds in the server configuration, at the same level as port. Also add it on the client side, but in outbounds.
For optimization, the main approach is to use BBR.
Important: be sure to check the system version. The following is for CentOS 7. If you use this on another version, the system may fail to boot on restart. For CentOS 8, see further below.
wget -N --no-check-certificate "https://raw.githubusercontent.com/chiakge/Linux-NetSpeed/master/tcp.sh" && chmod +x tcp.sh && ./tcp.sh
TCP Acceleration One-Click Installation Management Script [v1.3.1]
  -- Just Love Life | 94ish.me --

 0. Upgrade Script
————————————Kernel Management————————————
 1. Install BBR/BBR Modified Kernel
 2. Install BBRplus Kernel
 3. Install Lotserver (Rixu) Kernel
————————————Acceleration Management————————————
 4. Use BBR Acceleration
 5. Use BBR Modified Acceleration
 6. Use Violent BBR Modified Acceleration (not supported on some systems)
 7. Use BBRplus Acceleration
 8. Use Lotserver (Rixu) Acceleration
————————————Miscellaneous Management————————————
 9. Uninstall All Acceleration
 10. System Configuration Optimization
 11. Exit Script
————————————————————————————————

 Current status: BBR acceleration kernel installed, no acceleration module installed

 Please enter a number [0-11]:
Select 1. After installation is complete, restart the VPS, then restart V2Ray with systemctl start v2ray, run the script again with ./tcp.sh, and select 5, 5. Use BBR Modified Acceleration, to finish.
CentOS 8's default kernel version is 4.18.x. Any kernel version above 4.9 can directly enable BBR, so enabling BBR on CentOS 8 is very simple.
echo "net.core.default_qdisc=fq" >> /etc/sysctl.conf
echo "net.ipv4.tcp_congestion_control=bbr" >> /etc/sysctl.conf
sysctl -p
Then restart the system.
sysctl -n net.ipv4.tcp_congestion_control
lsmod | grep bbr
If the output contains BBR, it means BBR has been enabled successfully.
There are actually more optimizations available, but I simply haven't had time to implement them — this will do for now.