- Published on
Common Pitfalls with Autolayout and Masonry
Introduction
I recently encountered a complex view hierarchy: a root controller containing two child controllers (top and bottom), each implementing a PageView-like layout where every page is a WebView, with a draggable control in between that allows resizing the two child controller views. The reason for using child controllers was to avoid mixing all the logic into the root controller. So instead of using nicklockwood's iCarousel or SwipeView, I used SCPageViewController, which I had been using for a while.
Here I document a few pitfalls I encountered with Auto Layout.
About translatesAutoresizingMaskIntoConstraints
Because the view hierarchy was so complex, I ran into issues several times where I forgot to set translatesAutoresizingMaskIntoConstraints to NO. translatesAutoresizingMaskIntoConstraints defaults to YES, which means layout is computed based on the default autoresizingMask. Setting it to NO allows you to use the more flexible Auto Layout (or Masonry) for constraint-based layout.
Debugging Autolayout
When you first start using Auto Layout, encountering the following warning can be quite discouraging. Many developers give up on Auto Layout because they don't know how to deal with it.
Unable to simultaneously satisfy constraints.
Probably at least one of the constraints in the following list is one you don't want.
Try this:

(1) look at each constraint and try to figure out which you don't expect;
(2) find the code that added the unwanted constraint or constraints and fix it.
(Note: If you're seeing NSAutoresizingMaskLayoutConstraints that you don't understand, refer to the documentation for the UIView property translatesAutoresizingMaskIntoConstraints)

(...........)


Make a symbolic breakpoint at UIViewAlertForUnsatisfiableConstraints to catch this in the debugger.
The methods in the UIConstraintBasedLayoutDebugging category on UIView listed in <UIKit/UIView.h> may also be helpful.
As the output suggests: Make a symbolic breakpoint at UIViewAlertForUnsatisfiableConstraints to catch this in the debugger. Here's how to use the UIViewAlertForUnsatisfiableConstraints symbolic breakpoint for debugging.
Add a symbolic breakpoint at UIViewAlertForUnsatisfiableConstraints:
- Open the Breakpoint Navigator (
cmd+7)- Click the
+button in the lower left corner- Select
Add Symbolic Breakpoint- In the
Symbolfield, enterUIViewAlertForUnsatisfiableConstraints
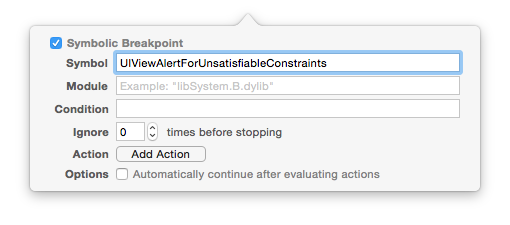
Once this breakpoint is set, you can debug through LLDB — though it's not very helpful if you don't know LLDB commands.
Here's a handy tip: add po [[UIWindow keyWindow] _autolayoutTrace] (for Objective-C projects) or expr -l objc++ -O -- [[UIWindow keyWindow] _autolayoutTrace] (for Swift projects).
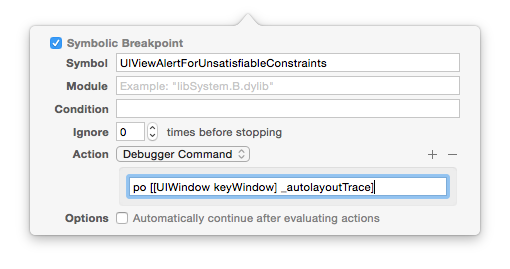
This gives you output like:
(lldb) po [[UIWindow keyWindow] _autolayoutTrace]

UIWindow:0x7f9481c93360
|   •UIView:0x7f9481c9d680
|   |   *UIView:0x7f9481c9d990- AMBIGUOUS LAYOUT for UIView:0x7f9481c9d990.minX{id: 13}, UIView:0x7f9481c9d990.minY{id: 16}
|   |   *_UILayoutGuide:0x7f9481c9e160- AMBIGUOUS LAYOUT for _UILayoutGuide:0x7f9481c9e160.minY{id: 17}
|   |   *_UILayoutGuide:0x7f9481c9ebb0- AMBIGUOUS LAYOUT for _UILayoutGuide:0x7f9481c9ebb0.minY{id: 27}
Views marked with AMBIGUOUS have constraint issues. 0x7f9481c9d990 is the memory address of the problematic view.
Further debugging requires LLDB commands. For example:
Print the view object:
(lldb) po 0x7f9481c9d990
<UIView: 0x7f9481c9d990; frame = (0 0; 768 359); autoresize = RM+BM; layer = <CALayer: 0x7fc82d338960>>
Change the color:
(lldb) expr ((UIView *)0x174197010).backgroundColor = [UIColor redColor]
(UICachedDeviceRGBColor *) $4 = 0x0000000174469cc0
Then find the view in your code and fix its constraints.
References:
Debugging iOS AutoLayout Issues Autolayout Breakpoints
Using Masonry
Understand the Difference Between Auto Layout Update Methods
-
setNeedsLayout: Marks the page as needing an update but doesn't start immediately.layoutSubviewswill be called shortly after. -
layoutIfNeeded: Forces an immediate layout update. It is generally used alongsidesetNeedsLayout. If you need a new frame to take effect immediately, call this method. It's also commonly used to trigger layout animations. -
layoutSubviews: System method — override to customize layout. -
setNeedsUpdateConstraints: Marks constraints as needing an update but doesn't start immediately. -
updateConstraintsIfNeeded: Forces an immediate constraint update. -
updateConstraints: System method for updating constraints.
Basic Usage
-
mas_makeConstraints: Add constraints. -
mas_updateConstraints: Update constraints; can also add new ones. -
mas_remakeConstraints: Replace all previous constraints.
Notes
-
Always add a view to the hierarchy before adding constraints to it.
-
To use animation effects, do the following:
//Override updateViewConstraints to update constraints
- (void)updateViewConstraints {
    [self.growingButton mas_updateConstraints:^(MASConstraintMaker *make) {
        make.center.mas_equalTo(self.view);

        // Initial width and height 100, lowest priority
        make.width.height.mas_equalTo(100 * self.scacle).priorityLow();
        // Maximum size capped at the full view
        make.width.height.lessThanOrEqualTo(self.view);
    }];
    [super updateViewConstraints];
}


// Mark constraints as needing update without executing immediately
[self setNeedsUpdateConstraints];
// Immediately update constraints to perform the dynamic change
// update constraints now so we can animate the change
[self updateConstraintsIfNeeded];
// Perform the animation with specified duration
[UIView animateWithDuration:0.2 animations:^{
   [self layoutIfNeeded];
}];
- Through testing, I found another approach: after calling
mas_remakeConstraints, you can animate directly usinglayoutIfNeeded.
self.button = ({
   UIButton *button = [[UIButton alloc] init];
   button.backgroundColor = [UIColor orangeColor];
   [self.view addSubview:button];
   [button mas_makeConstraints:^(MASConstraintMaker *make) {
       make.centerX.equalTo(self.view);
       make.width.height.equalTo(@100);
       make.top.equalTo(self.blueView.mas_bottom).with.offset(20);
   }];
   @weakify(self);
   [[button rac_signalForControlEvents:UIControlEventTouchUpInside] subscribeNext:^(id x) {

       @strongify(self);
       [self.blueView mas_remakeConstraints:^(MASConstraintMaker *make) {
        //Check the size state
           if (!self.isBigger) {
               make.top.bottom.left.right.equalTo(self.view).with.insets(UIEdgeInsetsMake(50, 50, 200, 50));
           } else {
               make.center.equalTo(self.view);
               make.width.height.equalTo(@200);
           }
       }];
       [UIView animateWithDuration:0.25f animations:^{
           [self.view layoutIfNeeded];
       }];

       self.isBigger = !self.isBigger;
   }];
   button;
});
Auto Layout with UIScrollView
The view I mentioned above involved multiple nested UIScrollViews, and using Auto Layout with them can be quite painful. For detailed techniques, refer to Masonry Auto Layout Part 9: Complex ScrollView Layout, Using Autolayout in UIScrollView, and iOS_autoLayout_Masonry. The main points to keep in mind are:
- The
UIScrollViewitself should have its constraints set like any other normal view. - Constraints for the inner subviews must not be set relative to
UIScrollView, and they must be complete, otherwise they won't properly expand thecontentSize. - Given the above two points, it ends up being roughly equivalent to calculating layout manually.
You can use a helper contentView for this approach. The rough idea is:
//First set the scrollview constraints
[_scrollView mas_makeConstraints:^(MASConstraintMaker *make) {
		make.edges.equalTo(self.view); // same size as self.view
}];
//Then set the contentView constraints
_contentView.backgroundColor = [UIColor greenColor];
   [_contentView mas_makeConstraints:^(MASConstraintMaker *make) {
		make.edges.equalTo(_scrollView); // size = _scrollView
       make.width.equalTo(_scrollView); // width = _scrollView
}];

UIView *lastView;
CGFloat height = 25;

//Add subviews and set their constraints; note that the top constraint is determined by the previous subview
for (int i = 0; i < 10; i++) {
	UIView *view = [[UIView alloc]init];
	view.backgroundColor = [self randomColor];
	[_contentView addSubview:view];

   [view mas_makeConstraints:^(MASConstraintMaker *make) {
		make.top.equalTo(lastView ? lastView.mas_bottom : @0); // first view top = 0
		make.left.equalTo(@0); // left 0
		make.width.equalTo(_contentView); // width = _contentView
		make.height.equalTo(@(height)); // height = height
   }];

   height += 25;
   lastView = view;
}

[_contentView mas_makeConstraints:^(MASConstraintMaker *make) {
	make.bottom.equalTo(lastView); // bottom = lastView
}];
For my project specifically, calculating everything was too painful, so I took a shortcut: since every view from the page view inward fills its parent, I could just use the default autoresizingMask for adaptive layout.
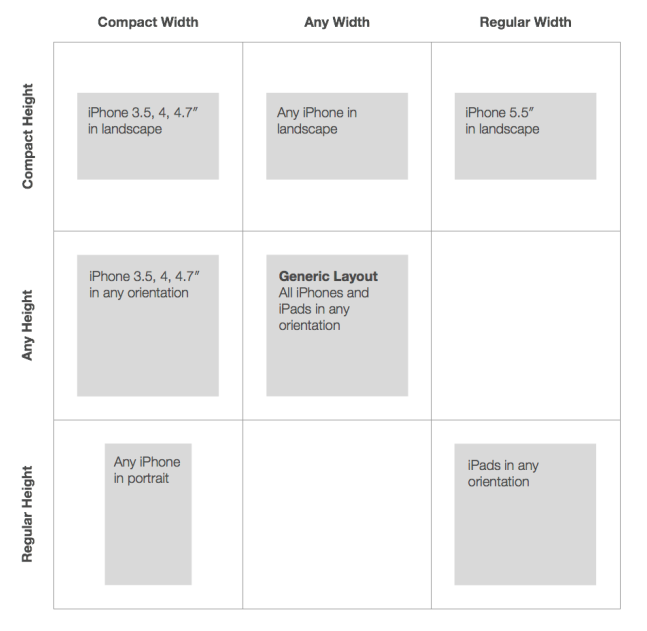
SizeClass Diagrams
Generally, if your layout needs to support iPad, using SizeClass is more convenient.
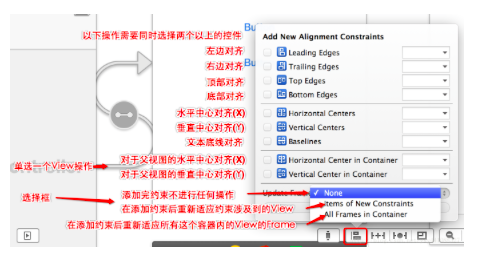
Constraint annotation:
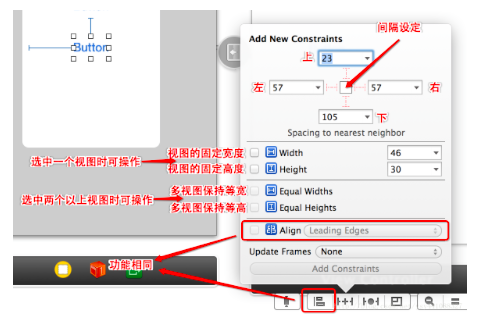
SizeClass annotation: